In a previous entry regarding to this subject I wrote about how hard it turned to be finding a free software solution for 3D scanning. Finally I found Python Photogrammetry Toolbox (PPT) which is the tool that I’ve used until now. It is based on Bundler and although it doesn’t seem to be working on Debian Jessie 8, it does well on 7 Wheezy. This and other apps used in the field of 3D photogrammetry based 3D reconstruction are available as well in the Archeos GNU/Linux distro, geared towards archeology work and needs.
Documentation on how to use PPT was quite sparse and kind of random and this has to do with me writing this now. I want to wirte down all the steps, not so obvious many of them, in order to achieve a nice and well textured 3D model of what we are about to scan. In this article we are just covering the PPT-GUI usage, leaving for another post how to process the pointclouds we obtain and the original pictures. Following the whole process I’m covering with these article series, I did some tests photoscanning rocks, and you can see the results here:
Perhaps I will omit some things and I’m not going to be super-exhaustive on everything; keep in mind that you can find links to the pages from which I took many of the clues here, and from there you can find the answers you’re perhaps missing.
-
I’m not sure about the development status of Pyhton Photogrammetry Toolbox and since then I found other free software for 3D reconstruction which seem quite usable too. Anyway you can download normally from this link placed in this page. According to the tests I did until now, it only works in Debian versions up to Wheezy (7). But I’ve recently tested it in Windows 10 and seems to be working properly. If some link is broken, try using Wayback Machine or in the worst scenario I could post the actual files I’ve downloaded.
-
Related or being part of this project, there is this Google Code page from which I was also able to download an almost identical package. You can see its name osm-bundler probably because it was developed with the scope of being used within Open Street Map.
-
The key benefits the developers say about this project are:
-
it is 100% free software based (many other photogrammetric solutions do not and have terms which discourage free commercial usage)
-
being Python based the program is more platform independent, although I don’t completely understand this.
-
If you downloaded osm-bundler_64bit.tar.gz from the first link in museidironzone.it, you just need to extract it and execute the file ppt_gui_start which is inside the folder osm-bundler > linux
-
I suggest you executing the software from the terminal. This way you can see some messages that are important to be aware of.
-
To do this, access the linux folder inside osm-bundler and type:
./ppt_gui_start
-
If it doesn’t work, make sure the path poniting to ppt_gui.py inside this script you’re just executing is correct.
-
If it still doesn’t work, perhaps you have another kind of issues related with unsatisfied dependencies, provided that the program is based in other ones to work. Have a look here in Google Code or in the OpenStreetMap wiki where those issues are covered. Don’t forget too to read every Readme file that comes with youw downloads, in order to get a big picture on how this works.
Another of the benefits of this tool is that it offers a graphical interface for those who aren’t so used to the terminal.
If the program starts properly, we should see a window similar to this:
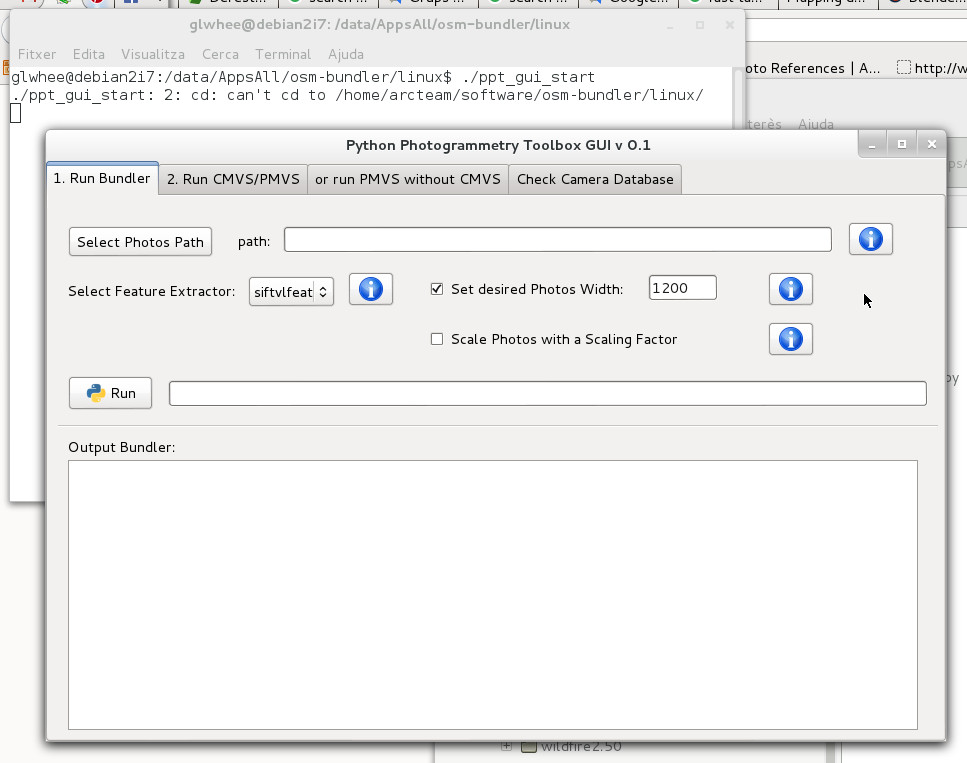
Here we need three tabs among the four present
-
1. Run Bundler
-
or run PVMS without CMVS
-
Check camera database
-
First we go to Check Camera database and using the corresponding button we will select the folder where the pictures we are using to do the reconstruction are stored. Once we have chosen this, click on the Run button on the same tab. Apparently nothing happened, but if you look at the terminal window from which we started ppt_gui, you should see (if everything goes well) the Camera is already inserted into the database message.
-
Select the path to the folder we just selected and copy (Ctrl+C) it.
-
Then we go to the first tab Run Bundler. Paste here the path you just copy in the previous step.
-
Check the option Scale Photos with a Scaling Factor and leave the value at 1 in order to obtain high resolution results.
-
Press Run. After some time (can be just a few minutes or a lot depending on the amount of pictures and the complexity of the model) a basic pointcloud is calculated.
-
You’ll see when calculation is finished when the message Finished! See the results in the ‘/tmp/foo_bar_folder’ directory appears in the terminal. Probably this same folder will be automatically shown within the file explorer.
-
Now that this folder and its contents are generated, you can cut and paste wherever you prefer on your hard drive, or keep it on /tmp. Wherever you place or leave it, copy its path because we need it in the following step.
-
Now we go to the or run PVMS without CMVS tab, the third one starting from the left side. There we check the option Use directly PMVS2 (without CMVS).
-
On the path field we paste the path from the previous step. Then press Run
-
When pthis process is finished, you’ll see another folder called pvms within the main one, and which containts another folder called models. If everything went well, you’ll see here a file which is precisly our freshly baked pointcloud, pmvs_options.txt.ply.
You can open this pointcloud file in Meshlab (inside an already created project, by using File > Import Mesh) and you’ll get a first idea about how well (or not so) the pointcloud was generated. In another post we’ll see how we can edit this pointcloud inside Meshlab to turn it into an actual mesh, and how to texture and export in order to use it in an external application such as Blender.
Sources used to elaborate this info: